Corporate Fitness and Active Aging

Working from Home: Ergonomics for Keeping Your Back Healthy

GettyImages-974640830 (1)Many of us suddenly have been thrust into working from home. I am sitting on a folding chair, leaning over my keyboard, looking at my laptop screen that is sitting on a folding table. Needless to say, I am not in an ergonomically sound position. The Mayo Clinic has a great blog about how to set up your workspace perfectly. If you have a real home office with an adjustable chair and monitor, please follow their directions.

Make Your Home Office More Ergonomic

We do not live in an ideal world. After two days of working from home, my back is already sore. We need to do the obvious things to make our new “offices” more ergonomic:

  • Check to make sure your feet are flat on the floor and your knees are at a comfortable 90 degrees.
  • Next, check your arms. Your elbows should be near your sides and at a 90-degree angle.
  • Your keyboard should be a comfortable distance away so that you are not reaching or scrunched.

These are the things you can control through office design.

Sit Correctly

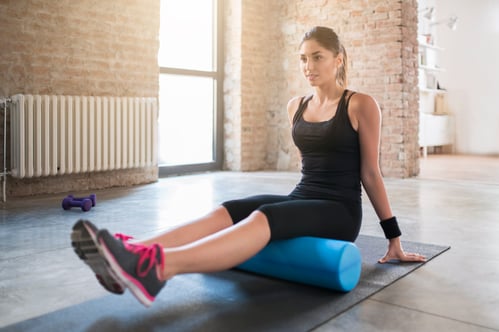
Your behavior will be what saves or destroys your back moving forward. There are a few simple steps and activities you can do to keep your back healthy. The first thing you need to do is to sit up straight. That means sitting up and bringing your shoulder blades back and down. You are most likely not going to be able to sit with perfect posture all day long. When you find yourself slouching, just reset and sit tall and roll your shoulders back and down again. For some of us, it might be uncomfortable to sit with proper posture because we are habitual slouchers. That’s okay too; start by sitting with great posture at the top of every hour.

Strengthen Your Back

The next activities are meant to strengthen your back. The first of these is a plank. Proper form for a plank is where you are in looking at the floor with either your elbows or hands directly beneath your shoulders; your back should be mostly flat with your pelvis rolled like you are trying to put your tailbone into your belly button. Your legs should be straight and together with either your knees or toes touching the ground. You should plan on doing planks 2–3 times a day for at least 20 seconds.

The next activity is a Superman. This is where you lie on your stomach and lift your arms and legs off the ground a few inches. You will do this 10–20 times in a row for 1–2 sets. For best results, alternate with planks.

Stretch Your Back

The last thing you can to save your back is to stretch it. We are going to do 10 cat/cows and 10 bird dogs, both at lunchtime and when you finish up for the day. These stretches are easy to do, and you will be surprised at how much better your back will feel.

Top 3 Tips to Keep Your Back from Getting Sore While Working from Home

These tips will help you survive working from home with your back intact.

Sit Up Straight

  • Practice good posture.
  • Sit tall with your shoulder blades back and down.

Strengthen Your Back 2–3 Times a Day

  • Do 2–3 planks for at least 20 seconds.
  • Do 2 sets of 10-20 Supermans.

Stretch at Lunch and When You Finish for the Day

  • Do 10 cat/cow stretches
  • Do 10 bird dogs

Are you working from home?  How do you incorporate a balance of sitting and moving to avoid a stiff back?  Comment below.

Topics: pain relief stretching ergonomics posture exercises planks working from home

A Fitness Pros Recs for Free Streaming Workouts

Woman Foam RollingGettyImages-590036654Before social distancing was a phrase many of us had heard of, online workouts had been gaining in popularity as a home-based fitness solution for a number of years. In fact, it was anticipated that it would grow by 30% from 2017 to 2022 but I suspect the COVID-19 isolation may bump that percentage further. People have expert trainers at their fingertips and the variety of workouts is endless all while in the comfort and convenience of your own home. Right now, this is one of the only solutions for many people whose gyms are closed and the weather isn’t quite warm enough in many parts of the country to shift our routines outside. There are subscription based services with a monthly fee and a number of great free options as well!

I jumped on the streaming bandwagon last fall when the weather started changing here in Indiana. I’m a fair weather outdoor fitness enthusiast – if I have to wear more than a long sleeve tee, count me out until spring. I decided to explore some free options before deciding whether I wanted to dip my toe in one of the subscription-based services and frankly I haven’t entertained the thought of paying for a subscription since.

What has surprised me most…

The Versatility

There is literally something for whatever mood I am in for any length of time I have available to work out. In any given week, I am doing kickboxing, Pilates, HITT, strength, etc., all for free and from the comfort of home. Talk about a boredom buster and I find it easier to not make excuses because I know there’s always an option.

The Flexibility

You can absolutely get a sweat pouring workout with little to no equipment. This was one of my main doubts as I looked at my workout area in our basement where I have bands, dumbbells, a yoga strap and mat and a 12’x12’ area of gym flooring. Once you peel back the mindset of needing all kinds of bells and whistles and fitness gadgets, it’s really phenomenal how great of a workout you can get with thoughtfully designed body weight movements and a few sets of dumbbells.

So here are my top three recommendations for streaming options you can access on YouTube for free.

  • Fitness Blender – this is where I started and this is where I find myself going back to the most. Kelli and Daniel provide so many different workout options and formats and they are pretty chill in their cueing and demeanor. I don’t personally need a pep talk through my workout. If I’ve motivated myself enough to head down to the basement, I don’t need further convincing once I’ve started and frankly it’s just noise to me. Their workouts are sound and well designed. I also love the fact that they don’t play music in their videos. The music on most online workouts I’ve experienced is basically noise with a beat (man that makes me sound old…) so I much prefer to play my own music while only listening to the trainers cueing.

  • Sydney Cummings – her workouts do a great job of keeping you on your toes. Sydney is really creative in her program design to add compound and dynamic movements. You remain focused on putting the different pieces of the exercise together (and trying to look as smooth as she does) opposed to how bad your muscles are burning or your heart is pounding. One con for me is the cheesy fitness/techno music. I have to turn my music up over hers and then sometimes have a hard time hearing her cueing which you really have to follow because her moves are so dynamic.

  • Yoga by Adrienne - admittedly I could use a little more yoga in my routine each week but when I do squeeze it in, Yoga by Adrienne delivers. Once again, she has so many different options available and has the perfect mixture of a calming tone but adding in some personality...and sometimes her dog joins her on the mat for a quick ear rub. I recently had tension and knots in my neck and shoulders in which I’d gone for a massage and had been stretching but could not seem to get any relief. I found a great routine with Adrienne targeting these areas and within three days that tightness was totally gone. I most often find myself pulling up one of these workouts as a cool down or finisher to a more intense workout and it always feels like the perfect supplement.

Like what you just read? Subscribe to our blog.

Whether you need a short-term fitness fix until your gym opens again or you are simply wanting to dip your toe in the fitness streaming world like I did, these free options a great place to start!

Topics: exercise program exercises workouts online streaming

Does Your Carpet Keep Tripping You? Work on Ankle Mobility!

GettyImages-185211535 (1) Ankle MobilityTell me if this has ever happened to you: You are fast asleep in your warm, comfy bed. In the middle of that perfect sleep, you suddenly hear the telephone ringing. So you open your eyes, sit up, and slide your feet into your slippers. At this point, you are in a rush because you are now thinking that it could be an emergency. You take a few steps as quickly as you can to get to the phone, which happens to be all the way across the room. Suddenly, the front of your slipper nicks the carpet and you feel yourself going down and fast.

You reach for something to grab but find nothing to get ahold of, so you throw out your hands to try to stop yourself from hitting the floor too hard. Now you’re lying on the carpet in pain because your hands and arms hurt as well as anywhere else you may have hit your body on the way down.

Why Does the Carpet Hate You?

You then remember how the carpet used to be your friend at a very young age. You recall how you used to love the carpet so deeply that you would fall asleep on it at times. As you got older, the friendship seemed to fizzle out. Over the last few years, it seems as though your old friend has it out for you because every time you come across it, it takes you down—and down hard!

Fear not. There could be a much simpler solution to this problem than avoiding all carpet everywhere. Maybe the problem has more to do with your ankle mobility.

Ankle Mobility Exercises

Following are a few examples of exercises that you can do to improve your ankle mobility.

  • Seated heel raises: Sit at the edge of a chair and place both feet on the ground with both knees at a 90-degree angle. While keeping your toes on the ground, raise your heels up for a count of 2 and down for a count of 2. Try doing 2 sets of 20 repetitions with both feet. You can challenge yourself by holding a weight or a heavy book on your knees for added resistance.
  • Seated toe raises: Sit at the edge of a chair and place both feet on the ground with both knees at a 90-degree angle. While your heels stay on the ground, raise your toes up for a count of 2 and down for a count of 2. Try doing 2 sets of 20 repetitions with both feet.
  • Seated ankle stretches: Sitting on a chair, raise one leg so that your foot is no longer in contact with the ground. Point your toes up and down. Try to do this stretch without kicking your leg up and down. Try doing 2 sets of 30 seconds with both feet.
  • Seated ankle circles: Sitting in a chair, raise one leg, lifting the foot from the ground. While your leg is raised, move your foot around in circles. Try to do it without moving the entire leg. You really want to focus on only moving the foot. Try doing 2 sets of 30 seconds in both directions with both feet.

Moving Forward

Click here to get more information and images of exercises that you can do to improve your foot or ankle mobility. And click here to learn a little more about mobility and stability.

Let us know how your next encounter with that dreadful carpet went by commenting below.

NIFS Fitness Management's programming can also help residents improve their balance with regular exercise.  Check out how Balance Redefined is changing residents lives!

Download Now

Topics: senior fitness injury prevention mobility exercises stability

Easy postpartum exercises for getting back on the wagon after baby arrives

NIFS | Mom and baby exercising
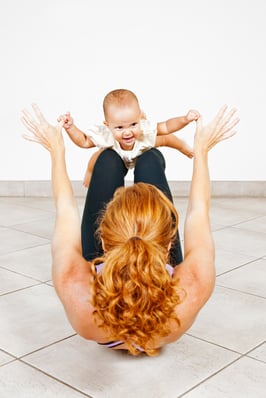
The baby has arrived! Congratulations! You just completed the toughest thing on the face of the Earth (at least in my opinion). You so graciously shared your body for up to 40 weeks and endured all the highs and lows that come with being pregnant. Now comes the not so fun part, trying to get that baby weight off. Unfortunately, I think in today’s society there is so much pressure on moms to get back to their “post baby body” as quickly as possible. This pressure can often cause unrealistic goal setting which leads to  frustration when you struggle to  get back to where you were before the baby arrived.

For me, one of the hardest things I’ve had to learn as a new mom has been taking my time to get back to where I was. I am currently six months post baby and have finally realized that my body (and lack of sleep!!) is going to be different than it was before. Listening to your body, learning patience and body acceptance is one of the best things you can do for yourself during this transition. Below I’ve listed several postpartum exercises that are great for easing back in to mild activity; they should help build the foundation for establishing a regular exercise program. Of course, always seek advice from your doctor before beginning any exercise program.

Walking, walking, walking! I used to HATE walking for exercise. I would much rather run. I thought if I wasn’t sweating and breathing heavily, I wasn’t getting a good workout. WRONG. Walking is your best friend before, during and after pregnancy. Even if you can only walk for 10 minutes and at a slow pace, do it. This will help you become familiar with your body again. You can still reap the benefits of cardiovascular health through walking, with a decreased risk of injury or overtraining. This is also an activity that you can incorporate with your newest addition if you’d like – a good walking/jogging stroller is a great investment!

Pelvic Tilts. That baby of yours took up a lot of room in your abdominal cavity and so graciously stretched its limits, so this exercise is going to improve your abdominal strength and stamina. It may also help you improve posture which can be changed during and after pregnancy. Start by lying on the floor on your back with your knees bent and your feet flat on the floor. Flatten you lower back against the floor by tightening your abdominal muscles and then begin tilting your pelvis up slightly. Exhale and repeat. Continue for 10-15 reps, several times a day.

Pelvic Bridges. There’s a good chance you learned about pelvic bridges while you were pregnant and I’m here to tell you to keep doing them! This exercise is a great way to strengthen your quadriceps, hamstrings, abdominals and glutes. It can also help stabilize your hips, which often become relaxed and soft to allow the baby to pass through during labor. Begin in the same starting posture for a pelvic tilt, resting your arms by your side, inhale and raise your pelvis off the floor while squeezing your buttocks. Exhale and lower your pelvis and lower back down to the floor. Start out with 6-10 repetitions holding them 5-10 seconds.

Remember, how the tortoise won the race? Slow and steady. That’s going to be your motto for the next few weeks (or months) as you maneuver your post pregnancy health and that’s okay. Your body created another human life and just for that you should be so proud of yourself! Sneak in whatever workout you can during this busy transition into motherhood. Stay positive and remember to love yourself and your new body. Congrats, mama!

Like what you just read? Subscribe to our blog.

Topics: exercises workouts postpartum exercises fitness for new moms exercise after pregnancy

My Favorite Workout: Trying New Exercises or Activities

ThinkstockPhotos-165103697.jpgSomeone recently asked me, “What is your favorite workout?” I thought about my answer for a little bit. I do like to run, and I usually run about three days a week, but is that my favorite workout? No, my favorite workout is always when I’m trying new exercises or activities!

Try a New Exercise or Activity

The workouts that I enjoy the most are the workouts that I haven’t tried before, or don’t get to do very often. Whether it’s a new obstacle course race, running a newfound path, hiking a new trail, indoor rock climbing, stand-up paddle boarding, a taking a new Barre class, or just changing up a high-intensity interval workout, new workouts and exercises can be challenging and fun.

I’m like most people, I think, and doing the same workout day-in and day-out can get old. Like I said, I still run about three days a week, but I also try to mix it up with new workouts on a regular basis. I recently went to an indoor trampoline park with my kids. I had so much fun! I also had no idea how sore I would be the next day, simply because I was having too much fun to realize how much of a workout I was really getting.

The Benefits of Trying Something New

Besides being fun, switching up your workouts and trying something new can have lots of other benefits. Changing your workouts regularly can help break through the dreaded weight-loss plateau. It can also help prevent overuse injuries and build new muscles that you don’t use during your typical workouts.

Continuously trying new workouts can help build your confidence and keep your brain healthy. When you learn something new, it can help you feel empowered, more confident and ready to learn other new skills. And, learning new skills helps keep your neurons firing and your brain sharp, and helps to prevent memory loss.

New Workouts to Try

Here are just a few ideas:

  • Group fitness classes—Vinyasa Yoga, Zumba, PiYo, Boot Camp, Barre, etc.
  • Sign up for a 5K or a 10K, or challenge yourself to a half or full marathon.
  • Ballroom dancing classes
  • Indoor rock climbing
  • Martial arts
  • Water sports—skiing, paddleboarding, kayaking, whitewater rafting, etc.
  • Ziplining
  • Outdoor obstacle courses

What are some activities that you have recently tried or would like to try?

Get your employees moving more!  Grab this free download for 7 ways you can add exercise to the workplace.  

FREE DOWNLOAD: 7 Ways to Add Exercise to the Workplace >


Topics: activities exercises workout

What Exercises Should I Do?: Guidelines for Senior Fitness (Part 4)

In my first, second, and third blogs of the series, I went over five of my guidelines to being successful in senior fitness:

  1. Muscle-Activation Exercises
  2. Simplistic Exercises
  3. Compound, Multi-joint, Closed-chain Movements
  4. Grip Exercises
  5. Mobility Work
In this fourth and final blog of the series, I discuss one more guideline:

Don't Change Exercises; Change the Intangibles and Variables of the Exercise

ThinkstockPhotos-95247776.jpgCertain exercises, such as the sit-to-stand and the seated row, should always be performed in one's routine. Certain experts recommend that one would eventually replace these exercises with a new one. The reasoning behind this is that it is believed that over time the muscles will grow accustomed to certain exercises and the effect will be lost. While this is slightly true, it's not true because of the exercise itself, but rather the variables of the exercise, such as the sets, reps, rest periods, tempo, etc.

By changing these variables, the CCRC resdient client will always have results and will continue to perform exercises that work the entire body in unison, such as the exercises in the preceding blogs. As a result, they will increase their performance in the daily activities of life.

After all, the more something is changed, the less that person will be good at it. If you want to get good at throwing a ball, you spend your time throwing a ball and not catching a ball. Well, the concept is the same with exercise. Constantly changing the exercises on someone will possibly give them results, but the question isn’t, "Is this person getting results?" Rather, the question is, "Is this the best way to do it?"

So, constantly changing the exercises may elicit a result, but we are looking for the best results; therefore, mastering and being consistent with basic, compound, multi-joint, closed-chain movements will help gain strength, increase lean muscle weight, increase mobility, work the body in unison, increase neurological activation, and lead to greater overall success.

Subscribe to our blog

Topics: CCRC balance senior fitness change mobility exercises grip

What Exercises Should I Do?: Guidelines for Senior Fitness (Part 2)

In my first blog, I discussed two of my guidelines for senior fitness:

  1. Muscle-Activation Exercises
  2. Simplistic Exercises

In this second blog, i will discuss different movements and grip exercises.

Guideline 3: Compound, Multi-joint, Closed-chain Movements

Exercises like sit-to-stands, which are modified squats; and a vertical and horizontal pressing and pulling movement, such as seated rows and wall pushups, just to name a few, give you more bang for your buck. Movements like this burn more calories and fat, lead to greater strength and lean muscle gains, and most importantly, they work the body in unison.

These exercises work multiple muscle groups through the range of motion of multiple joints. For instance, a sit-to-stand works the quads, hamstrings, hips, calves, and even the upper back due to maintaining a neutral, upright spine. Also, this exercise uses these particular muscles through the range of motion of the hip joint, knees, ankles, and more. Isolation exercises, on the other hand, only work one muscle through the range of motion of one joint. For instance, a leg extension works the quads through the range of motion of the knee joint.

When CCRC residents, or anyone for that matter, perform daily activities such as standing up after ThinkstockPhotos-145159937.jpglunch, walking down the hallway, or picking up groceries, multiple muscles are being used through the range of motion of multiple joints. That’s why the compound, multi-joint, closed-chain movements are so much more effective than isolation, single-joint, open-chain movements.

These exercises also increase neurological activation. Compound exercises allow the individual to lift heavier loads, as opposed to isolation movements. Lifting heavier loads demands an involvement of larger muscles, which places more demand on the central nervous system to activate more motor units and fire them off at a faster and higher rate.

These exercises are great for balance, as well. Strength-training exercises are extremely effective for increasing balance. One question I always like to ask residents is, “Would you say that your balance is worse than it was ten years ago?” The answer is usually a resounding yes. Then I ask, “Why do you think that is? Ten years ago, did you regularly perform balance exercises?” The answer to this question is usually a resounding no. What this tells me is that as the resident got older, they lost muscle. As the muscle atrophied, they lost the strength to appropriately balance themselves. Furthermore, if they had a fall, they'd be even more reluctant to do anything. This fear would lead to even more inactivity and muscle atrophy, leading to a steady decline in balance. My suggestion? Center most of the training on the main compound movements and add isolation exercises in for lagging, injured, or imbalanced muscle groups.

Guideline 4: Grip Exercises

Most residents have arthritis in their hands; therefore, they have poor range of motion with them. Hand strength is vital for many reasons. From being able to grab their eating utensil to being able to grab the railing when they walk the halls, grip strength is vital. Doing crushing-grip exercises, like using a hand gripper from a sports store; or rubber band forearm extensor exercises, which are vital to avoid an imbalance from the crushing-grip work; and pinching grip exercises with a dumbbell allows clients to strengthen their hands, reduce, pain and increase range of motion.

***

Watch for my next blog when I introduce a fifth guideline for senior fitness—mobility work.

Interested in doing more for your residents and how you can create a culture of wellness?  Click below to see how you can do just that! 

Whitepaper+Wellness Culture


Topics: CCRC NIFS balance senior fitness muscles exercises